Building your own gaming PC can be a rewarding and cost-effective way to create a powerful machine that meets your specific needs. Whether you’re a seasoned gamer or a first-time builder, assembling a gaming PC gives you complete control over the components you choose and the performance you get. In this guide, we’ll walk you through the entire process, from selecting the right parts to assembling your gaming PC.
Step 1: Choose Your Components
The first step in building a gaming PC is selecting the right components. The components you choose will have a direct impact on the performance of your system, so it’s important to choose wisely. Here are the key components you’ll need:
- CPU (Processor): The CPU is the brain of your PC. For gaming, you’ll want a processor that can handle the demands of modern games. Look for CPUs from Intel (such as the Core i7 or i9) or AMD (like the Ryzen 7 or Ryzen 9) for optimal performance.
- GPU (Graphics Card): The GPU is the most important component for gaming performance. It handles rendering graphics and plays a huge role in your frame rates and visual quality. Popular gaming GPUs come from NVIDIA (like the RTX 3060 or RTX 4080) and AMD (such as the Radeon RX 6800 XT).
- Motherboard: The motherboard connects all your components together. Choose a motherboard that’s compatible with your CPU, and make sure it has the necessary ports and expansion slots for your needs. For Intel CPUs, look for Z-series motherboards, and for AMD, opt for B-series or X-series boards.
- RAM (Memory): For gaming, you’ll want at least 16GB of RAM, though 32GB is becoming more common for high-end systems. DDR4 or DDR5 RAM is the standard for gaming PCs.
- Storage: A combination of a Solid-State Drive (SSD) for fast boot times and game loading and a Hard Disk Drive (HDD) for larger storage capacity is common. For gaming, a 500GB to 1TB SSD is a good starting point, with additional HDD storage if needed.
- Power Supply (PSU): A reliable PSU is essential to power your components. Choose a PSU that provides enough wattage to handle your system, typically between 500W and 750W for most gaming builds. Look for 80+ Gold or Platinum-rated PSUs for better efficiency.
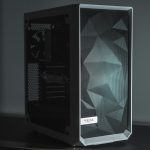
- Case: The case houses all your components. Choose a case that’s large enough to fit your components and provides good airflow for cooling. Cases with mesh panels and space for multiple 120mm or 140mm fans are ideal for gaming PCs.
- Cooling System: A good cooling system ensures your components don’t overheat. While stock cooling might work for most builds, adding aftermarket air coolers or even a liquid cooling system can help keep your CPU and GPU temperatures in check during heavy gaming sessions.
Step 2: Prepare Your Workspace
Before you start building, make sure you have a clean, static-free workspace. Static electricity can damage your components, so it’s important to handle everything carefully. Consider using an anti-static wristband to prevent any electrostatic discharge (ESD) from harming your parts.
Make sure you have the necessary tools on hand, such as a Phillips-head screwdriver, cable ties for cable management, and a good source of light for working in tight spaces.
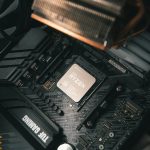
Step 3: Install the CPU
The first component you’ll install is the CPU. Start by carefully unboxing your CPU and placing it into the CPU socket on the motherboard. Most motherboards have a protective cover that needs to be removed first. Align the CPU with the socket and gently place it into position. The CPU will only fit one way, so don’t force it.
Once the CPU is in place, secure it with the latch or lever on the socket, and apply thermal paste if necessary. Some coolers come with pre-applied thermal paste, but if yours doesn’t, apply a small pea-sized amount to the center of the CPU.
Step 4: Install the RAM
Next, install your RAM. Most motherboards have color-coded slots for RAM installation. If you’re installing two sticks of RAM, place them in the same-colored slots for dual-channel memory, which can improve performance.
Gently press each stick of RAM into the slot until you hear a click, ensuring the clips on the sides are securely holding the RAM in place.
Step 5: Install the CPU Cooler
Install your CPU cooler next. If you’re using an air cooler, place it over the CPU and secure it with screws or clips provided by the cooler manufacturer. If you’re using a liquid cooler, follow the manufacturer’s instructions for mounting the radiator and securing the pump to the CPU.
Make sure the cooler is oriented for optimal airflow, and ensure that it’s seated correctly to avoid any potential issues with overheating.
Step 6: Install the Motherboard into the Case
Now that your CPU, RAM, and cooler are installed, it’s time to mount the motherboard in your case. First, align the motherboard with the standoffs in the case to avoid shorting the board. Then, carefully screw the motherboard into place.
Make sure that all ports and connectors on the motherboard line up with the holes on the case’s I/O shield.
Step 7: Install the GPU
Next, install the GPU. Most modern GPUs are large and may require more space in your case, so be sure you’ve chosen a case that can accommodate your graphics card. To install the GPU, remove the appropriate expansion slot covers at the back of the case and carefully insert the card into the PCIe slot on the motherboard. Secure the GPU in place with screws.
Step 8: Connect the Power Supply
Now it’s time to install the power supply (PSU). Place the PSU in its designated spot in the case, and screw it into place. Next, connect the necessary power cables to your components. This includes the 24-pin ATX cable for the motherboard, the 8-pin CPU power cable, and the PCIe power cables for your GPU.
Make sure that all cables are connected securely and that they’re routed neatly to prevent airflow blockages.
Step 9: Install Storage Drives
Install your storage devices next. If you have an SSD and HDD, mount them in the appropriate drive bays in your case. Use the screws or tool-less mounting options provided by the case. After securing the drives, connect them to the motherboard and PSU using the appropriate cables (SATA cables for HDDs/SSDs and power cables for the PSU).
Step 10: Cable Management and Final Checks
Before closing the case, spend some time organizing your cables. Use cable ties or the cable management features built into the case to ensure that cables are out of the airflow path. This will not only make your build look cleaner, but it will also improve airflow and cooling efficiency.
Double-check that all components are securely connected and that no cables are blocking fans or vents.
Step 11: Boot Up Your System
Once everything is installed, it’s time to power up your system. Connect your monitor, keyboard, and mouse to the PC, and turn on the power supply. Press the power button on your case, and you should see the system boot into the BIOS.
From here, you can check that all your components are recognized and that your system is running smoothly. You’ll also want to install your operating system (usually Windows 10 or 11) and the necessary drivers for your motherboard, GPU, and other components.
Conclusion
Building your own gaming PC is a highly rewarding process that allows you to customize your machine for your exact gaming needs. By carefully selecting your components and following the steps outlined in this guide, you’ll be able to create a gaming PC that offers fantastic performance, great aesthetics, and a sense of pride in your work.
Remember, the key to a successful build is patience and attention to detail. Take your time during each step, and soon you’ll have a high-performance gaming rig ready to tackle any game you throw at it.